How to Spec a Move for a High-End Renovation Project
A high-end renovation move starts long before installation day.
A designer we work with was deep into a full-floor gut renovation at a waterfront property in Naples. The primary bedroom suite had been completely gutted, which meant months of demo, mechanical work, and millwork. Her client had a pair of custom upholstered chairs she’d sourced from a vendor in North Carolina, both in a pale linen that had been discontinued. They were sitting in a back bedroom, covered in drop cloths, about twenty feet from where the drywall crew was working.
By the time she called us, the chairs had been there for six weeks. The dust had gotten into the fabric in a way that wouldn’t come out without professional cleaning, and one had a small but visible watermark from a contractor’s water bottle sitting on the arm. The fabric was discontinued. There was no replacing it.
Both chairs came out of the project fine, eventually, but it cost the designer a cleaning bill, a difficult conversation with the client, and two weeks of timeline she didn’t have. Moving them offsite at the start of demo would have taken one afternoon.
For interior designers and decorators, builders and architects, and private clients, the logistics window opens during deconstruction and doesn’t close until the last piece is placed. Existing furniture needs to leave before construction begins. New arrivals show up while the home is still unfinished. And when install day comes, every piece needs to arrive in the right order, in the right condition, and with the right level of care.
William C. Huff helps interior designers and decorators, builders and architects, and private clients plan high-value renovation moves from start to finish. Through our Elite Designer Services, we support move-outs, renovation storage, receiving, inspection, last-mile delivery, white-glove moving, and specialty handling.
Phase 1: Pre-Construction, What to Move Out and Where to Store It
Before construction begins, decide what should leave the home.
The instinct is usually to protect pieces from the obvious risks: a wall coming down, a floor being refinished. The less obvious ones are what tend to cause problems. Dust from demo works its way into upholstery and wood grain. Vibration from construction loosens joints on antiques. Moisture from paint, concrete, and adhesives gets into everything. A piece doesn’t have to be in the work zone to be affected by it.
By the time construction is underway, it’s usually too late to wish the antique sideboard had been moved out.
Start with the pieces that would be hard to repair or replace:
- Fine art, framed works, sculptures, and collectibles
- Antiques and heirlooms
- Upholstered furniture
- Rugs and textiles
- Custom furniture that will return after the renovation
- Fragile mirrors, lighting, and decorative accessories
- Wine collections or temperature-sensitive items
- Furniture near demolition, painting, flooring, or millwork areas
Choose storage based on the value of the contents
A renovation inventory keeps everyone aligned. It gives the designer, homeowner, contractor, and logistics team a shared record of what left the home, where it went, and where it should return.
Include:
- Item name or description
- Room of origin
- Condition notes
- Photos before packing or pickup
- Dimensions, when helpful
- Storage destination
- Final placement notes
- Special handling instructions
This step matters even more when the project includes both existing pieces and new purchases arriving during construction.
Choose storage based on the value of the contents
Furniture storage during renovation should protect more than space in the home. It should protect condition, organization, and access.
William C. Huff’s Renovation Storage services are designed for clients who need secure storage while a home is being remodeled, repaired, restored, or redesigned. For art, antiques, textiles, wood furniture, and other sensitive pieces, climate-controlled storage may be the safest option.
Good renovation storage should include careful packing, inventory tracking, secure handling, and clear labeling by room, phase, or install sequence.
Phase 2: During the Build, Coordinating Vendor Deliveries
This is where many designer-led renovations get complicated.
The sofa ships early. The rug arrives before the floors are sealed. A custom table comes in crated and no one wants to open it at the jobsite. The lighting vendor needs a delivery signature, but the contractor doesn’t want more boxes in the garage. The dining chairs are somewhere between the vendor and the freight carrier and nobody can tell you exactly where.
Meanwhile, the designer is expected to know what arrived, what’s damaged, what’s missing, and what’s ready for install. On top of everything else.
A receiving warehouse gives every delivery a controlled place to land. Instead of chasing down vendors and coordinating with a contractor who has other things to worry about, the designer has one point of contact and a record of everything that’s come in.
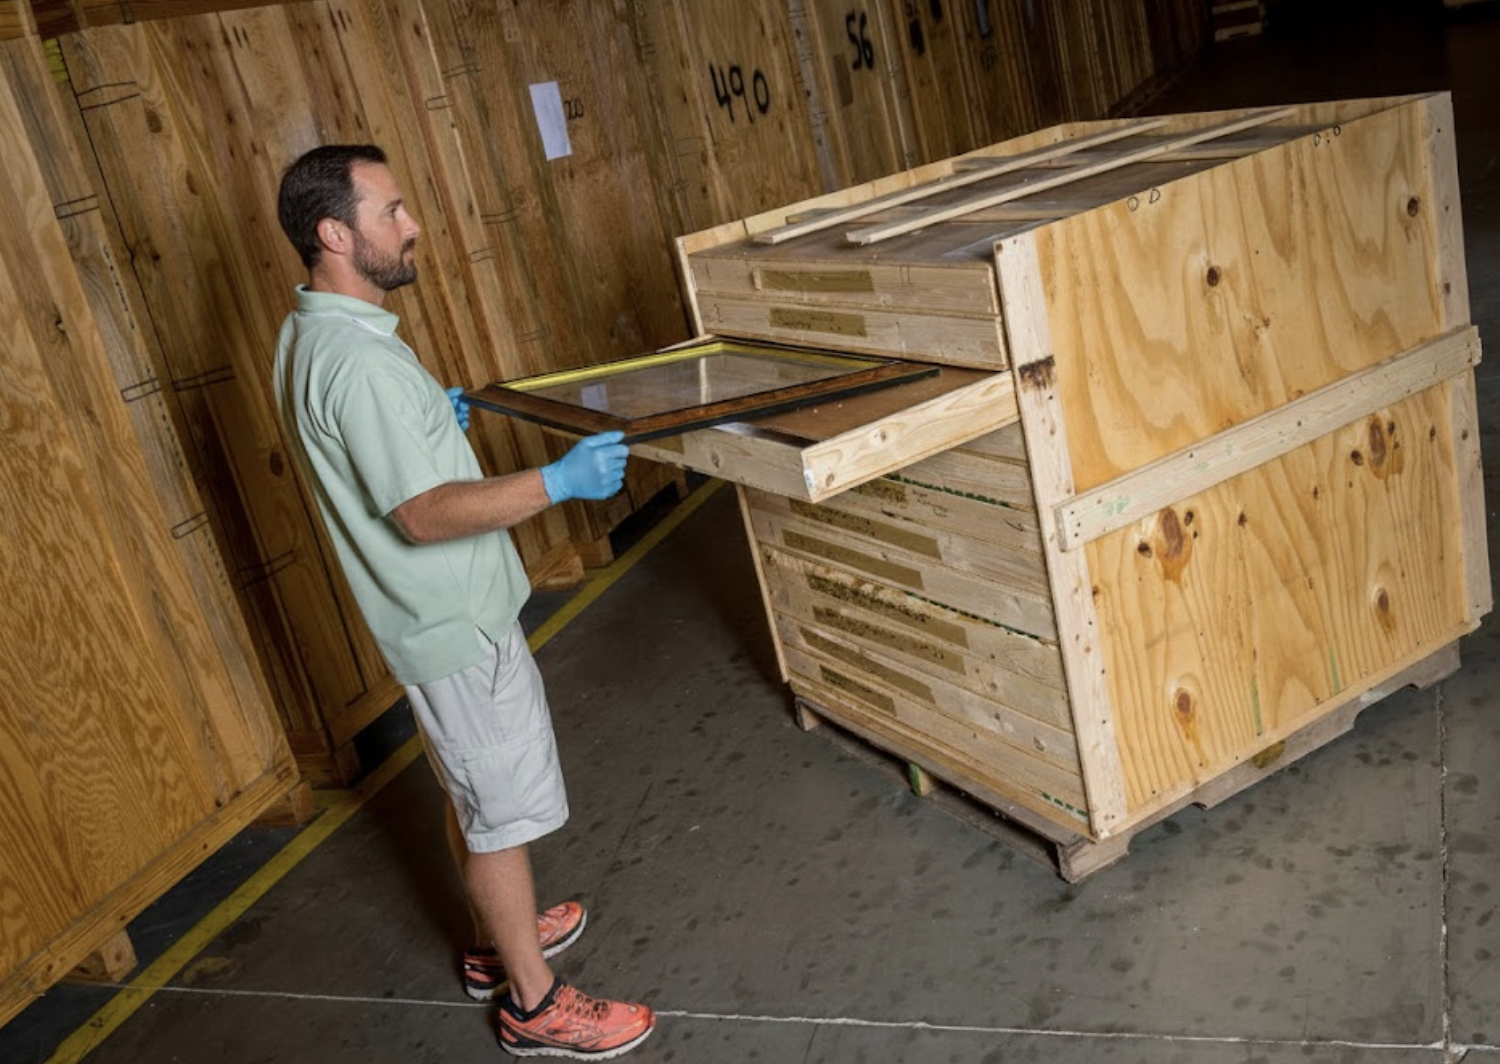
What designer receiving and inspection includes
Designer receiving means project purchases are sent to a professional warehouse instead of directly to the renovation site. When each item arrives, the team documents the delivery, inspects the piece, photographs its condition, notes visible issues, and stores it until the designer is ready for final delivery.
William C. Huff’s Elite Designer Receiving & Inspection services help designers manage the space between vendor shipment and final placement.
That middle step is where problems get caught.
A receiving team can flag damaged packaging, missing hardware, wrong finishes, incorrect quantities, or pieces that should not move forward to install without designer review.
What to send to the receiving team
Give the receiving team the same context you would want if you were opening the box yourself.
Send:
- Client name and project name
- Vendor list
- Purchase orders or shipment details
- Item descriptions
- Designer contact information
- Installation address
- Target install date or phase
- Special handling notes
- Inspection requirements
- Pieces that should not be opened without approval
For designers managing multiple projects, receiving is not just storage. It’s quality control, schedule control, and client-experience control.
By install day, the designer should not be wondering what is inside each box.
Phase 3: Install Day, Delivery, Protection, and Placement
Install day is when the renovation starts to feel finished.
It’s also when small planning gaps become very visible.
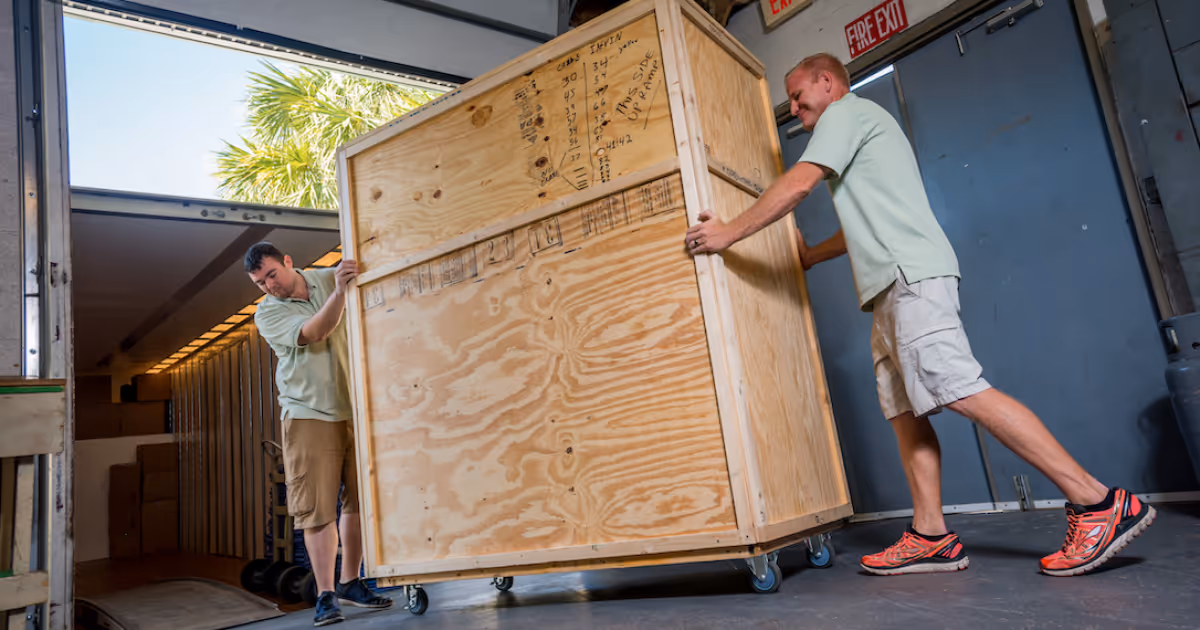
A white-glove moving partner should know how to work inside a finished or nearly finished home. That means protecting floors and walls, watching access points, placing pieces according to the designer’s plan, and slowing down when something needs a decision.
William C. Huff’s White Glove Moving and Last Mile Delivery services support the final stage of renovation logistics, when furnishings, art, accessories, and specialty pieces move from storage, receiving, vendor, or showroom to the completed home.
Sequence matters
Some items need to go in before others.
Rugs usually come before beds and large furniture. Large casegoods may need to be placed before smaller pieces. Art, mirrors, accessories, and styling items often come later.
Before install day, confirm:
- Which rooms are ready
- Which entry points should be used
- Whether elevators, gates, loading docks, or building access need to be reserved
- Which pieces should be delivered first
- Which pieces need extra handlers or equipment
- Which items require assembly
- Who can approve placement changes onsite
Protect the finished space
Newly finished homes need careful handling.
Floors may be sealed. Walls may be freshly painted or covered in specialty wallcovering. Cabinetry, millwork, and lighting may already be complete. A white-glove crew should prepare for that before unloading begins.
Site protection may include floor runners, corner protection, door protection, careful unpacking, clean handling, debris removal, and coordination with any contractors still onsite.
Place with the design plan in mind
White-glove moving for interior designers should include more than drop-off.
The crew should be able to follow room plans, labels, elevations, and placement notes. They should also know when to pause for a designer’s decision instead of forcing a rushed placement.
Depending on the project, install support may include furniture placement, rug placement, bed assembly, mirror coordination, art coordination, unpacking, debris removal, and room-by-room setup.
The last thing anyone wants is a beautiful room with a delivery problem in the middle of it.
Use this as a planning framework, not a rigid project schedule. The goal is to know what is moving, where it’s going, when it needs to arrive, and who is responsible for each handoff.
8+ weeks out: Plan the move-out and storage
At this stage, focus on the big decisions.
- Identify rooms or areas affected by the renovation
- Decide what stays, what leaves, and what will return
- Build a photo inventory of pieces being moved or stored
- Flag art, antiques, custom furniture, oversized items, and climate-sensitive pieces
- Confirm whether the project needs Renovation Storage
- Walk the site with the homeowner, contractor, and logistics partner when possible
A Simple Timeline for Designers
4 to 8 weeks out: Set up receiving and vendor coordination
This is when the move plan connects to purchasing.
- Create a vendor delivery tracker
- Decide which items should ship to receiving instead of the jobsite
- Send receiving instructions to vendors
- Share purchase orders, item descriptions, shipment details, and special handling notes
- Confirm access details for the final delivery location
- Flag items that need inspection, assembly, hardware tracking, or special handling
1 to 4 weeks out: Confirm site readiness and install sequence
Now the plan needs to get specific.
- Confirm which rooms will be ready and when
- Review all items in storage or receiving
- Identify anything missing, delayed, damaged, or incorrect
- Group items by room, phase, or delivery priority
- Share final floor plans, labels, or placement notes with the logistics partner
- Decide who will be onsite to approve placement decisions
Install day and after: Deliver, place, and document
This is when the planning pays off.
- Review the delivery sequence before unloading begins
- Confirm site protection is in place
- Place rugs, large furniture, and major pieces first
- Inspect pieces as they are unpacked
- Document damage, missing parts, or site issues right away
- Keep packaging for items that may require a vendor claim
- Schedule follow-up delivery for delayed pieces
Specialty Pieces That Need Extra Planning
Some pieces need more than a line item on the move list.
They may be fragile, oversized, custom-built, unusually heavy, or tied to the construction schedule. Identify them early so the logistics plan can account for packing, access, equipment, storage, timing, and final placement.
Custom cabinetry and millwork
Cabinetry, built-ins, and millwork components often need to arrive in sequence with the builder’s schedule. A damaged or delayed piece can affect more than delivery. It can hold up installation.
William C. Huff’s Custom Cabinet Transportation services support careful transport and delivery coordination for renovation and construction projects.
Confirm dimensions, weight, delivery phase, site access, installer coordination, staging location, and whether pieces should remain wrapped until installation.
Custom furniture
Custom furniture often comes with long lead times, specific finishes, and limited replacement options.
William C. Huff’s Custom Furniture Transportation services are designed for pieces that need careful handling from pickup through final placement.
Confirm finish sensitivity, upholstery protection, wrapping needs, assembly requirements, placement notes, vendor documentation, and receiving inspection requirements.
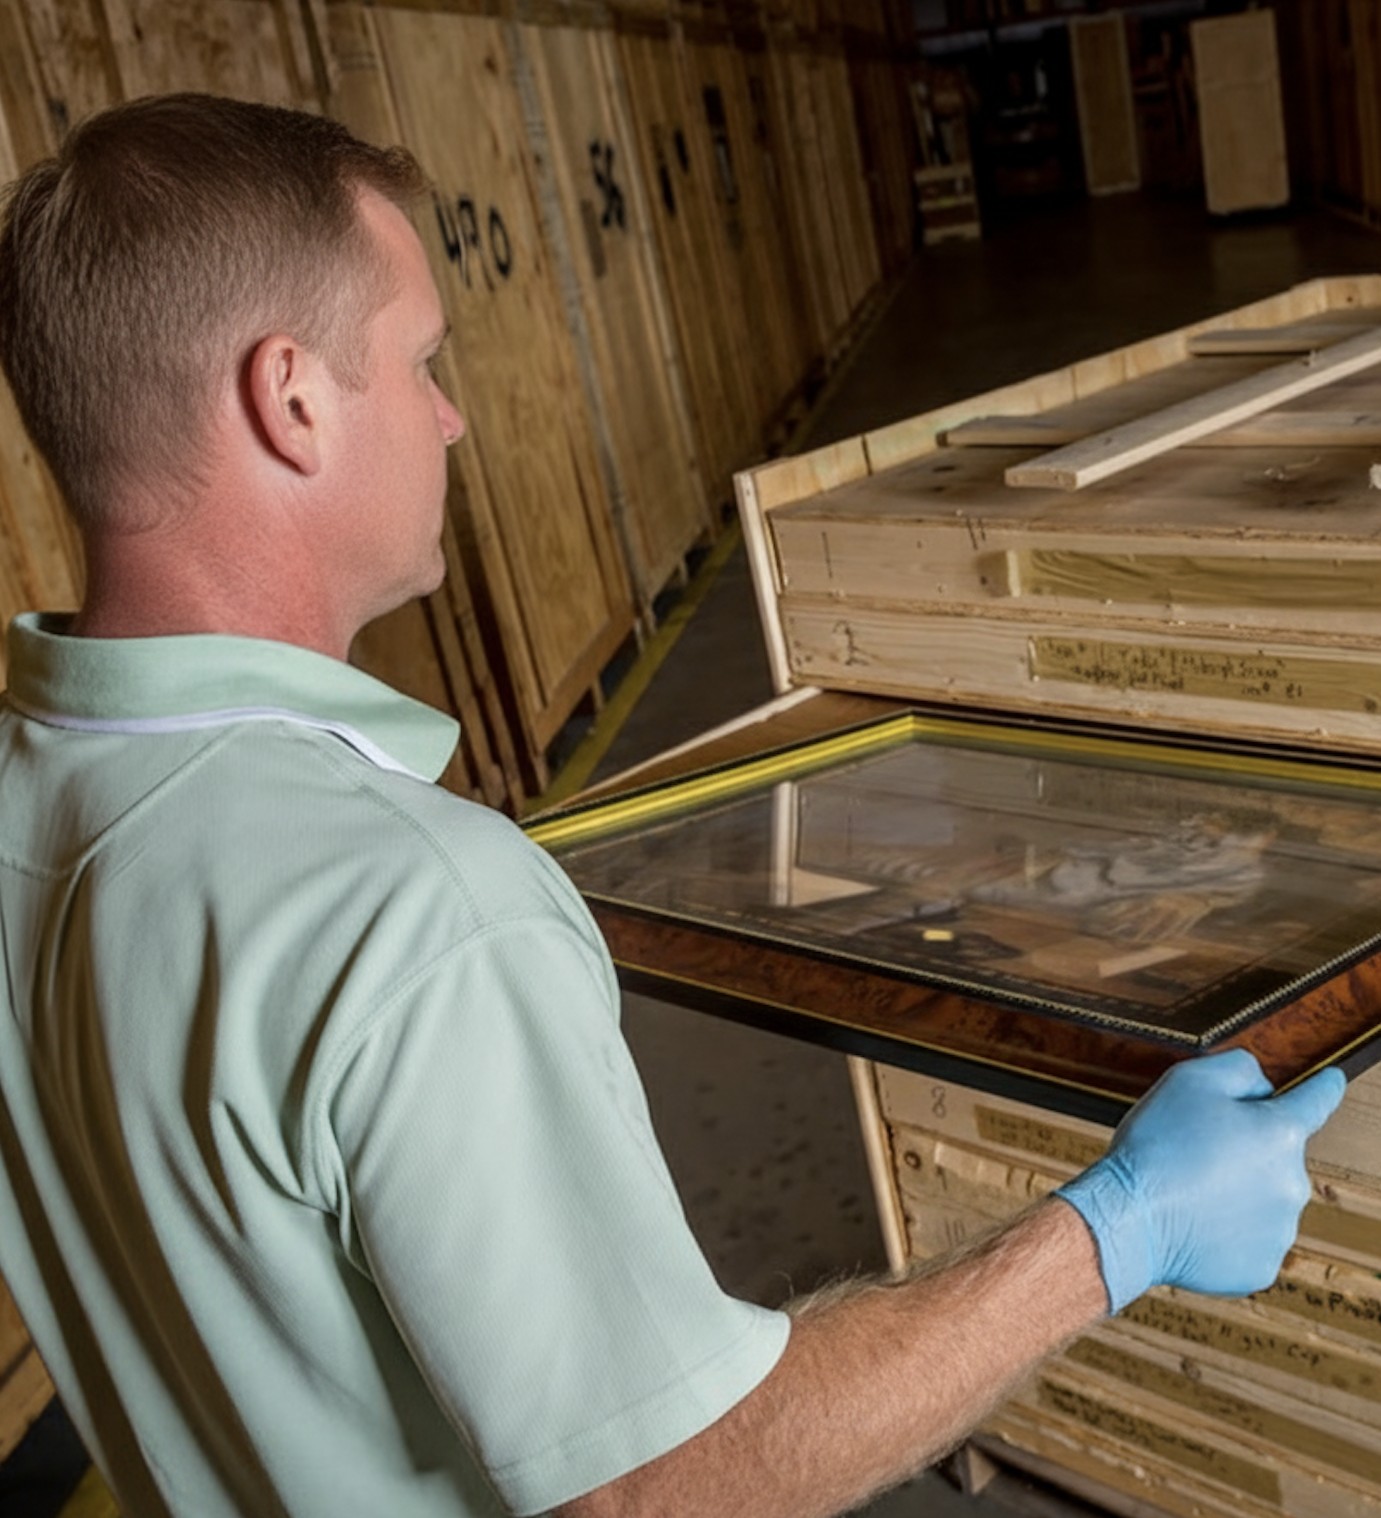
Fine art and fragile collections
Art may need to leave before construction begins, stay in climate-controlled storage, or return after the room is mostly furnished.
William C. Huff’s Fine Art Moving services support artwork, sculpture, framed works, collections, and other sensitive pieces. For a deeper art-specific resource, see our Fine Art Moving & Logistics: The Complete Guide.
Confirm condition documentation, packing needs, climate sensitivity, storage duration, final placement, installation timing, and insurance or valuation details.
Oversized and difficult-access items
Large sofas, dining tables, mirrors, stone pieces, chandeliers, sculptures, and specialty furnishings should be reviewed before install day.
Confirm entry measurements, stair and elevator clearance, hallway turns, ceiling heights, handler requirements, equipment needs, and alternate delivery methods if needed.
If a piece would be hard to replace, it deserves its own line in the plan.
Frequently Asked Questions
Start with anything fragile, valuable, custom, hard to replace, or close to the work zone. Fine art, antiques, upholstered furniture, rugs, mirrors, lighting, heirlooms, and custom pieces are usually safer offsite than covered onsite. When in doubt, move it out. The cost of storage is almost always lower than the cost of repairing or replacing a damaged piece.
Share the project address, construction timeline, room list, inventory, photos, floor plans, access details, parking instructions, special handling notes, and final placement plans if available. For vendor deliveries, include purchase orders, shipment dates, item descriptions, and inspection requirements.
For anything beyond a minor scope of work, the answer is usually no. Dust, moisture, vibration, and contractor traffic create risks that are easy to underestimate until a piece is already damaged. If the renovation involves demo, flooring, painting, or millwork anywhere near a valuable item, offsite storage is the safer call. It also gives the contractor more room to work efficiently.
Designer receiving means vendor deliveries are sent to a warehouse instead of the jobsite. Items are received, inspected, documented, and stored until the home is ready for delivery. It is especially useful for projects with multiple vendors, custom pieces, long lead times, or phased installs.
Measure entry doors, elevators, stairwells, hallways, tight turns, ceiling heights, and the rooms where large pieces will be placed. Also confirm driveway access, loading areas, gate clearance, and building restrictions.
Document it right away. Photograph the packaging, labels, item condition, and visible damage. Keep packaging materials until the designer, vendor, or freight carrier confirms next steps. Receiving and inspection services help catch these issues before the item reaches the client’s home. Freight damage claim windows can be as short as 15 days from delivery, so timing matters.
A designer, project lead, or trusted decision-maker should be onsite whenever possible. Install day often involves small placement decisions that are easier to solve in the room than over text.
For large or high-value projects, start planning 8 to 12 weeks ahead. Smaller projects may need less lead time, but early planning is always better when construction schedules can shift.
Yes. William C. Huff can support pre-construction move-out, Renovation Storage, Elite Designer Receiving & Inspection, White Glove Moving, Last Mile Delivery, and specialty handling for fine art, custom furniture, cabinetry, and oversized pieces.
Plan the Move Before the Install Depends on It
A high-end renovation move works best when logistics are planned early.
The designer should know what is leaving the home, what is going into storage, where vendor deliveries are going, how items will be inspected, and what needs to happen before install day.
William C. Huff helps design professionals manage the details behind exceptional interiors, from pre-construction move-out and renovation storage to receiving, inspection, white-glove moving, and final placement.